Nesting has been rather difficult for me. We weren't planning on having kids just yet (have I mentioned that yet?) and we're still tenants, living in an apartment. Granted, a very cute apartment:
We live on the top floor of this house in downtown Claremont, also a very cute locale. Actually, until three and a half months ago, we lived in the right-hand side of the downstairs bit of the house. The house, originally built in 1925, is divided into three apartments: the downstairs is split down the middle, and the upstairs is one big lovely apartment. We moved upstairs when we found out I was pregnant (since our upstairs neighbor happened to be moving, quite conveniently), not wanting to share a thin wall with neighbors with a squawking baby.
Not that Tiny will squawk. Tiny will never squawk. (Please, Tiny?)
So now we live upstairs. When we tell people that we moved upstairs because I was pregnant, they usually ask, "Oh, so you have two bedrooms now?"
Well, no. But we do have ... nooks.
Observe:
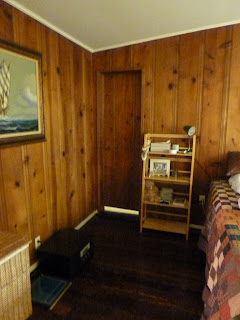
This is the nook off our bedroom; it's actually the jutting-out bit of the house that you can see in the photo of our house's exterior. Originally, we planned on just keeping Tiny in there. We were going to get a smaller crib on wheels, so we could move it around the nook and out to the living room if Tiny ended up actually squawking, or something. But... the crib I liked was over $900 (of course), and then a family from church went and gave us a crib, and we realized just how large cribs actually are.
So we decided to convert our handy Secret Storage Closet into a nursery.
Observe:
Notice anything?
How about now?
See? Secret Storage Closet. That's right, we're going to be keeping our baby in a closet. Rejoice, Bess. You won't be the only closest-dweller soon.
But there was a catch, see. We used our storage closet as a storage closet. It was full of all kinds of stuff, like an air mattress and sleeping bag for visitors (please? visitors?), Eric's longboard, papers and photos from high school, my scrapbooking supplies, old clothes we aren't ready to get rid of yet, our ironing board, Eric's tools ... you get the idea. So we decided to move all that junk to our Even Secreter Storage Closet, which is hidden inside our Secret Storage Closet.
The house was built in 1925, remember? It's got all sorts of little quirks.
Our Even Secreter Storage Closet is pretty small, though. While our Secret Storage Closet is actually the size of a tiny room, our Secreter Storage Closet is smaller than most storage closets. So we had to get shelving of some variety to hold our junks.
This is where nesting became difficult. Shelving, of any variety, costs money. The summer is our poorest time of year. So we decided to wait until Eric's grant money arrived to convert the Secret Storage Closet into a nursery.
That's why I've been throwing all my nesting energies (and those ain't no joke, people -- it happens) into making things like baby shoes and crochet sock monkeys (Mr. Monkey, by the way, didn't get nearly as much traffic as I think he deserves... perhaps because I neglected to mention that I made him myself).
This weekend, however, we finally cleaned out our Secret Storage Closet to begin the conversion:
(This photo was actually taken from our porch. See, our Secret Storage Closet actually has two secret entrances -- one from our bedroom, shown above, and this one from our porch. Here, Eric is moving things onto the shelf in our Secreter Storage Closet -- that's the open door you see. The entrance from our bedroom is directly across from that open door.)
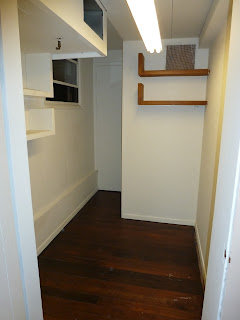
Once we got everything cleaned out and the place all swept up, we realized that we had another nesting problem:
This tiny room is butt-ugly.
It could be worse. The shelves are actually rather cute, or will be once they're covered with cute baby things. There's a window, and the floors are hardwood, like the rest of the apartment.
But still, I have my work cut out for me. Obviously, the first thing I would love to do is paint. Being tenants, though, that's not really an option. It may be only a storage closet, but our landlady is french, and gets dramatic over things like hanging cafe lights on our porch (this is still a battle).
Not only is this room ugly, but it's also rather rough, being a storage closet:
There's the horrific florescent lights, the odd grating over the shelf, the awkward "baseboard," the random plank (?) nailed in the corner of the wall. What the what are these elements doing here?
Not only rough, but hazardous:
The hardwood floor simply doesn't extend all the way to the wall for about a four-foot stretch. It's like someone cut out a four-foot-by-one-inch segment of the floor, either because he was high or simply destructive. Odd?
Underneath this odd overhang in the ceiling (complete with empty air duct vent, lined with classy aluminum), is this dangerous-looking, mysterious metal projectile, of which we cannot figure out the use to save our lives.
Whatever it is, it's right at head level for anyone a quarter of an inch taller than Eric.
So clearly, I have my work cut out for me. Stay tuned. I've started brainstorming a list of things to do to the place, but suggestions are welcome!


I love reading your updates. And I can't wait to see pictures of Tiny!
ReplyDeleteHey Wendy! Know what you need? Wall stickers. We did classic pooh wall stickers for Finnian's room (we are tenants too) and they worked great! They are pretty inexpensive and non-permanent. By the way, we were given that exact same crib. no joke.
ReplyDeleteWendy, did you ever see my suite in the, well, Suites at Hillsdale? I might have pics somewhere... But I found this cheap (read: $3.00!) curtain rod from Wal-Mart as well as a couple of queen-size bedsheets (I had chosen red), and some sticky 3M hooks. I was able to run the curtain rod through the top edge of sheet--seriously, no sewing required!--and hung the sheets on the wall. Basically, it was a curtain-covered wall. But it made those bland walls in the Suites look so much better! Kind of like a focal wall, when you can't paint. All in all it cost me only about $20.00 to do--less than a can of paint. It could also be a great way to hide some of those weird shelves!
ReplyDeletehey wendy! it's going to be such a cute little space! i feel like it has lots of potential. a couple ideas: 1) make a garland of some sort. easy to do and you can use cheap scraps of fabric, old clothes or any number of things. 2) is there any natural light? if so, you should get a corn plant. they can survive with practically nothing, and if you did nothing to your baby's room, but had one plant, i think it would look amazing. 3) remove the light if possible, and if not, cover it up, and don't use it. see this: http://pinterest.com/pin/33241942/, and then use a lamp or two. 4) Pay attention to the details. Find baskets instead of plastic bins to hold Tiny's things. And stick with a really strict color scheme. The details will tie it all together, no matter how little you have to spend.
ReplyDeleteThe thrift store and craigslist are your friends! Can't wait to see what it looks like when you're done! Keep us updated with your progress! :)
You are so cute. I didn't know you like scrapbooking too! We should have been more than just Latin friends. I'm so excited for you!
ReplyDeleteooo i forgot to mention: rugs!!!! they obviously cost money, but i thought i would mention it anyway in case you happen upon a free or uber cheap one somewhere. :)
ReplyDelete